
Important: Do not connect the base station to the local network (LAN) until you have completed Step 4. Provisioning cannot be initiated automatically if the base station is connected before then.
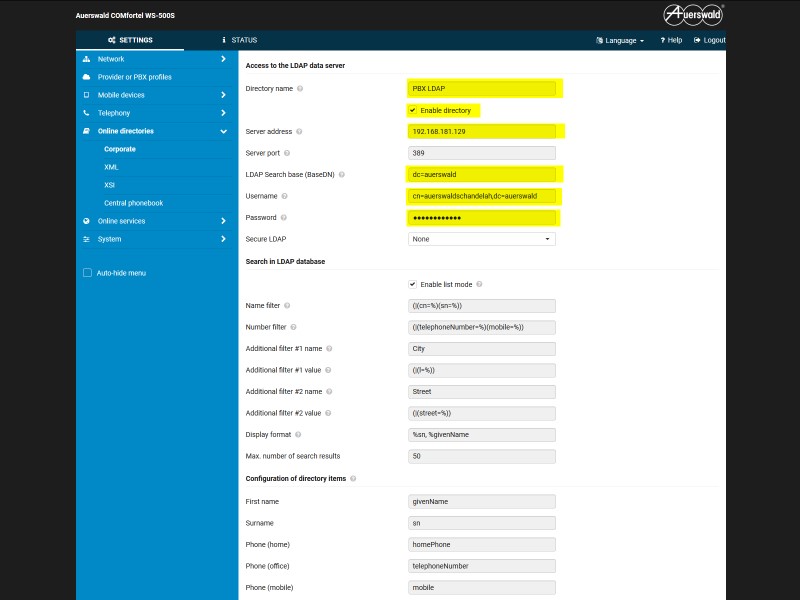
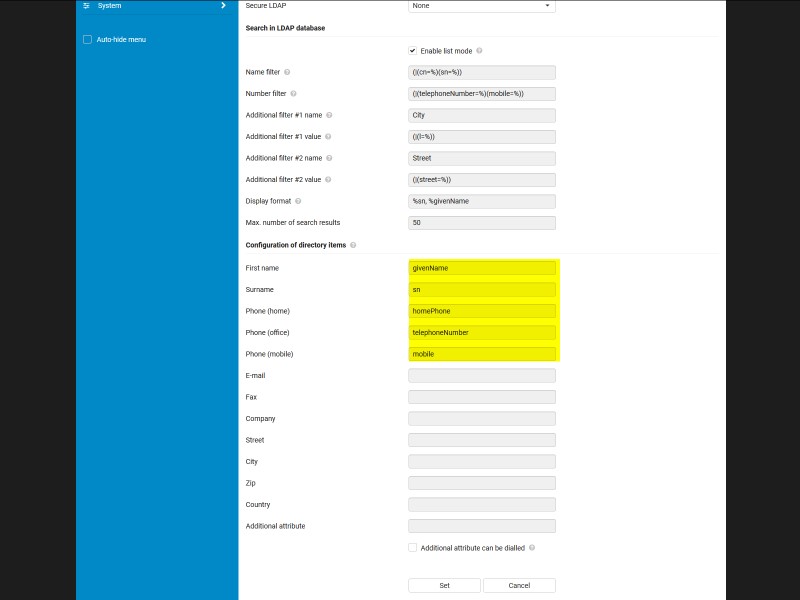
Note: If LDAP is set up and selected, the provisioning process copies the PBX telephone book (also called a "directory") to the template in all the handsets.
When installing DECT base stations, the following must be taken into account:
Always mount base stations on interior walls for radio coverage within the building.
The optimum mounting height of a base station is between 1.8 and 3 m, depending on the room height. If you mount the base stations lower, interference from furniture or moving objects may occur. A minimum distance of 0.50 m from the ceiling should be maintained.
It is recommended that all base stations be mounted at the same height.
Do not mount the base station in false ceilings, cupboards or other enclosed fixtures. Depending on the materials used, this can significantly reduce radio coverage.
The base station should be mounted vertically.
The location and orientation of the installed base station should be identical to the position considered optimal for measurement.
Avoid the immediate vicinity of cable ducts, metal cabinets and other large metal parts. These can reduce radiation and introduce interference signals. You should keep a minimum distance of 50 cm.


Firmware version
- as of version 1.8.2 (COMtrexx)
- as of version 8.4B 000 (for all other listed PBXs)
Aaron.ai is listed as a VoIP Provider, but Aaron is actually a service provider that offers automated Voice services, as such no calls can be placed or received through a Aaron trunk. Aaron provides their customers with a dedicated number for their SIP services which allows the customers to forward calls to this number (and this number only) on a Aaron trunk.
To make sure that only the dedicated calls a routed to Aaron and no other calls are routed this way some special settings are required.
Step 1: under “Public switched tel. Networks”→ VoIP→ Provider click import and select the Aaron template.
Step 2: under VoIP→ Accounts add a new Account with the credentials provided by Aaron.
Step 3: In “Subscriber (scr.)”→ Profiles → Configuration add a new profile named “No Aaron” based on “Standard Phone”, which has to be assigned to all telephones with outside lines instead of the “Standard Phone” profile. Activate the Profile override for “Exchange line authorisation” and switch it to “Exchange line dependent”. Under “Expert” switch Aaron to “Only internal” and save the settings.
Step 4: Assign the new profile “No Aaron” to all phones.
Step 5: Add a new Dummy Subscriber which will be used to forward calls to Aaron. The Dummy can not use the Profile “No Aaron” but will have to use the Standard phone profile. However in “Subscriber (scr.)”→ Phone numbers → (Dummy Account) → “Exchange line settings”→ “Exchange line authorisation” you have to switch it to “Exchange line dependent” and use the Expert button to set all providers beside Aaron to “Only incomming”. Aaron should be switched to National or International if the number Aaron provided you is not a national number for you.
Further you will have to set and activate “CF (call forwarding) immediately” to the SIP Access number provided by Aaron and activate “cascading” for the Dummy Subscriber.
Save the settings.
Take note: If further subscribers are added you have to make sure they use the “No Aaron” profile.
Use: by setting CF on busy or CF on no reply to the number of the dummy subscriber, calls can now be transferred to Aaron.
Extension possibilities (point system)
The maximum number of individual modules can be calculated using the following table. Each module has a value and can be used in the COMmander 6000 at a defined frequency. The sum of all values must not exceed the maximum value of 188.
| Score points of the module | ||
| Modultyp | Score points | max. number in expansion |
| COMmander 8/16VoIP(-R) Module | 16 | 4 |
| COMmander VMF(-R) Module | 16 | 1 |
| COMmander S2M(-R) Module | 32 | 1 |
| COMmander 4S0(-R) Module (for variant 6000RX) | 8 | 5 (12) |
| COMmander 8S0(-R) Module (for variant 6000RX) | 16 | 4 (9) |
| COMmander 8UP0(-R) Module (for variant 6000RX) | 16 | 4 (9) |
| COMmander 8a/b(-R) Module (for variant 6000RX) | 8 | 4 (8) |
| COMmander 2TSM(-R) Module / 4 points per module | 4 | 4 |
Example:
COMmander 6000 with 2x COMmander 8S0 module (2*16 points = 32 points) and 1x COMmander VMF module (16 points).
With this extension 32+16=48 points are achieved. 140 points can still be used. Here, however, the max. module extension of 5 modules should be considered additionally.
Hackers always use the same method: they are looking for companies whose PBX has an integrated voicemail function (answering machine) in order to manipulate it via remote access. All PBXs that have been recently manipulated showed poor security measures such as insecure PINs. Auerswald PBXs have sufficient security mechanisms. But they have to be used!
Therefore, please follow the following recommendations to protect your Auerswald PBX against such attacks:
As installer and operator (customer) of telecommunication equipment you are legally obligated (Telekommunikationsgesetz § 108) to ensure the unhindered and prioritized routing of emergency calls (numbers 110 and 112).
Therefore please note the following essentials:
Note: Update your COMpact 4000/5000/5000R or COMmander 6000/R/RX to the current firmware as soon as possible and on older systems check the configured emergency numbers 110 and 112 as well as the emergency medical services 116117.
Storage specifications (USB stick, SD-card)
USB-stick
PBXs | |||||
| Device | max. storage capacity | min. write speed | min. read speed | min. number of write cycles | filesystem format |
| COMpact 3000 | 16 GB | 4 MByte/sec | 6 MByte/sec | 1M. | FAT/FAT32 |
| COMpact 4000 | 16 GB | 6 MByte/sec | 9 MByte/sec | 2M. | FAT/FAT32 (will be reformatted to EXT4 by the system) |
| COMpact 5000 | 16 GB | 6 MByte/sec | 9 MByte/sec | 2M. | FAT/FAT32 (will be reformatted to EXT4 by the system) |
| COMpact 50x0 VoIP | 16 GB | 6 MByte/sec | 9 MByte/sec | 2M. | FAT/FAT32 |
| COMmander 6000 without VMF-module | 16 GB | 6 MByte/sec | 9 MByte/sec | 2M. | FAT/FAT32 (will be reformatted to EXT4 by the system) |
Telephones | |||||
| Device | max. storage capacity | min. write speed | min. read speed | min. number of write cycles | filesystem format |
| COMfortel VoIP 2500 AB | 4 GB | 4 MByte/sec | 6 MByte/sec | 200.000 | FAT/FAT32 |
| COMfortel 3200 | 32 GB | 2 MByte/sec | 2 MByte/sec | 10.000 | FAT/FAT32 |
| COMfortel 3500 | 32 GB | 2 MByte/sec | 2 MByte/sec | 10.000 | FAT/FAT32 |
SD-card
PBXs | |||||
| Device | max. storage capacity | min. write speed | min. read speed | min. number of write cycles | filesystem format |
| COMpact 3000 | 16 GB | 5 MByte/sec | 8 MByte/sec | 200.000 | FAT/FAT32 |
| COMpact 4000 | SD-card is embedded and cannot be replaced by the user. | ||||
| COMpact 5000 | SD-card is embedded and cannot be replaced by the user. | ||||
| COMmander 6000 ohne VMF-Modul | SD-card is embedded and cannot be replaced by the user. | ||||
| VMF-Modul | 16 GB | 9 MByte/sec | 15 MByte/sec | 4M. | FAT/FAT32 |
Telephones | |||||
| Device | max. storage capacity | min. write speed | min. read speed | min. number of write cycles | filesystem format |
| COMfortel 1400 (MicroSD) | 16 GB | 3 MByte/sec | 3 MByte/sec | 200.000 | FAT/FAT32 |
| COMfortel 1400 IP (MicroSD) | 16 GB | 3 MByte/sec | 3 MByte/sec | 200.000 | FAT/FAT32 |
| COMfortel 2500 | 4 GB | 3 MByte/sec | 3 MByte/sec | 200.000 | FAT |
| COMfortel 2600 | 16 GB | 3 MByte/sec | 3 MByte/sec | 200.000 | FAT/FAT32 |
| COMfortel 2600 IP | 16 GB | 3 MByte/sec | 3 MByte/sec | 200.000 | FAT/FAT32 |
| COMfortel 3200 | 16 GB | 3 MByte/sec | 3 MByte/sec | 200.000 | FAT/FAT32 |
| COMfortel 3500 | 16 GB | 3 MByte/sec | 3 MByte/sec | 200.000 | FAT/FAT32 |
| COMfortel 3600 IP | 16 GB | 3 MByte/sec | 3 MByte/sec | 200.000 | FAT/FAT32 |
Accessories | |||||
| Device | max. storage capacity | min write speed | min. read speed | min. number of write cycles | filesystem format |
| WG-640 | 4 GB | 2 MByte/sec | 3 MByte/sec | 2.000.000 | FAT/FAT32 |
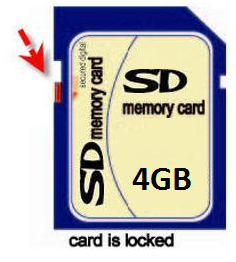
Info for using 16GB SD-cards:
Please note that the device's operating speed can get reduced due to the larger storage size.
In this case it is recommend to format the SD-card to 4GB with a PC.
Creating an SD card for the Auerswald PBX operating system from an SD card image in Windows

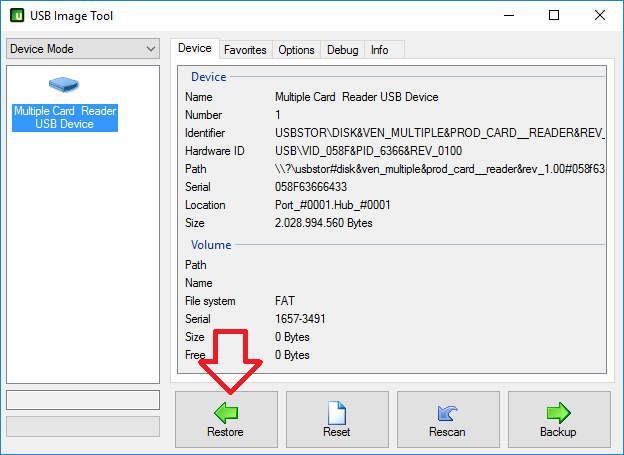
Select the card reader:
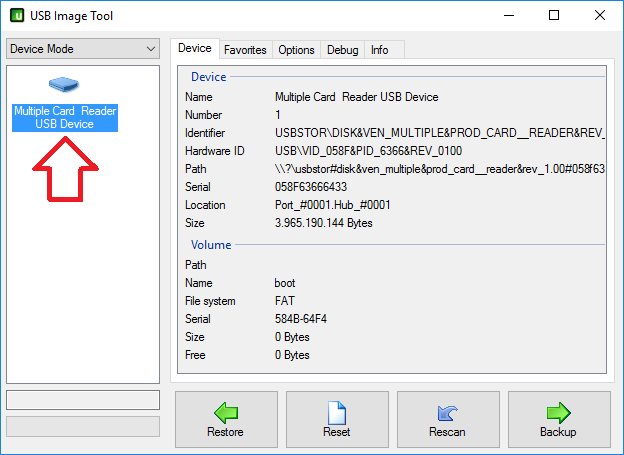
Now click Restore:
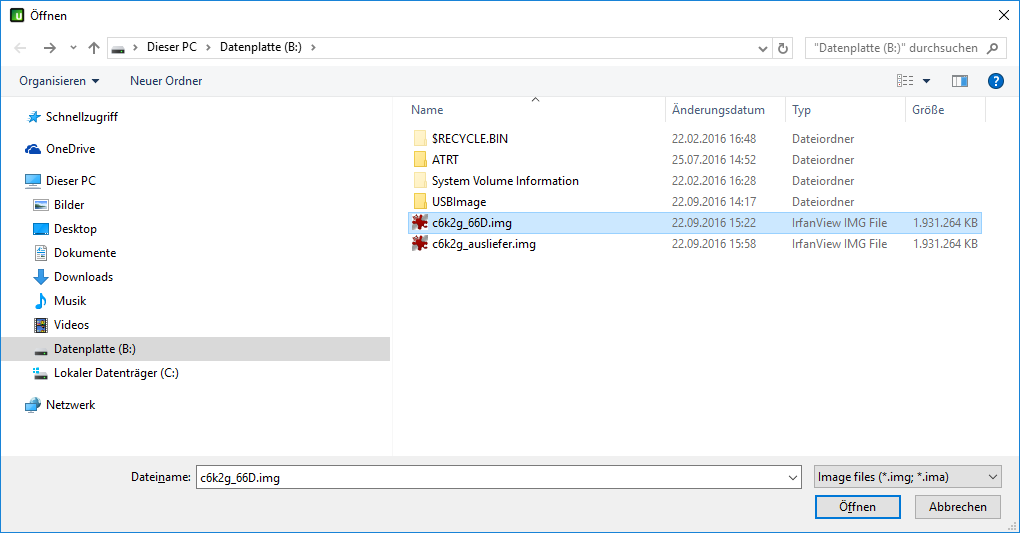
Select the previously saved image file and click Open:
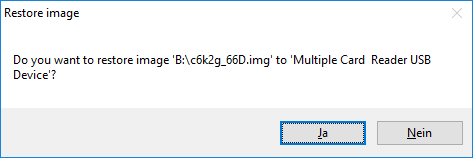
Confirm the following dialogue with Yes:
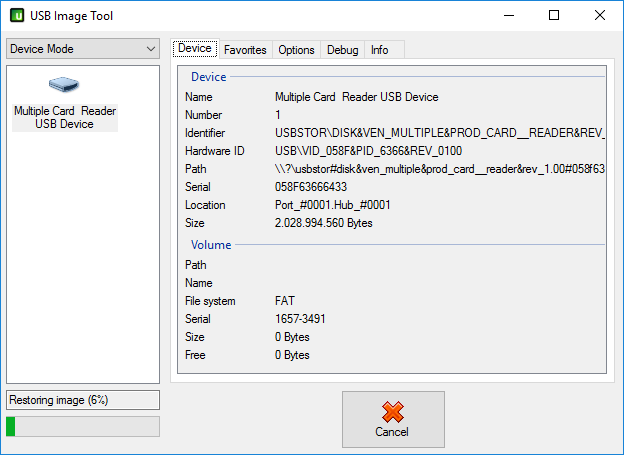
The image will now be written to the SD card. Wait until the green progress bar reaches 100%.
Remove the SD card. Switch the write-protect switch on the SD card to the lock position: Lock
You can now use the card in the PBX.
Under the following conditions the PBX can signal the busy-tone for addional incoming callers:
If these conditions are met, additional incoming callers get the busy-tone. If it doesn't work it is not the PBX's fault anymore. What could be the cause now?
How can I verify that the PBX is correctly signaling busy?
The PBX's call-distribution should be set to signal more than one subscriber, busy-on-busy is enabled or set to "from 1st connection on" (depending on the PBX). For the first incoming call all the configured subscribers ring and one of them takes the call. For the second incoming call no additional subscribers should ring. If they do the PBX's configuration should be checked. If the caller gets a ring-tone but the PBX's subscribers don't ring, one of the above described examples applies. If the caller gets the busy-tone, the function is ok.
Preparing the PBX for Remote Access
Registering the PBX in ARA


Method 1: Activation by any internal phone
Method 2: Activation by the dealer from a distance
Auerswald takes the protection of personal data very seriously. Please read the internet privacy statement and the general terms and conditions.
Requirements:
Configuration:
If not already done so, enter your dialing rules and location information in the telephone-/modem options (Windows Control Panel). Enter the connection information (IP-address, port, LAN-TAPI-password) in the LAN-TAPI-driver's settings.
On the PBX's menu check or otherwise change the LAN-TAPI-settings (IP-address, port, LAN-TAPI-password) according to the driver's settings.
Make sure that any necessary dongle licenses were purchased and also create a list of LAN-TAPI subscribers in the PBX's LAN-TAPI-settings.
Deactivate the RAS-service in your server's admintrative tools and reboot the machine. After the reboot restart the server's telephony service.
Test:
Run the Windows dialer and set the subscriber you want to test in the options.
Enter a destination number and dial.
Network and computers
PBX
Telephones
Depending on the phone the full extent of the LAN-Tapi functions may not be available. For example, among others, automatic call setup, toggling and forwarding calls is not supported with standard phones (non systemphones). For more detailed information please see the description of the LAN-Tapi driver on www.auerswald.de.
Software
PBXs with external ISDN connection
If you have a router that supports IP-telephony which also offers an internal ISDN-port (S0-port) you can generally connect the PBX's external ISDN-port to it. It is to note however that the PBX is now operated as a sub-PBX behind your router. Various features which are controlled by the network provider and operated by the PBX (such as call-forwarding via provider) can no longer be used. Since this is also dependent on the router we can't provide a listing of what exact features these are.
PBXs with external analog connection
If you have a router that supports IP-telephony which also offers internal analog ports you can generally connect the PBX's external analog port to it. It is to note however that the PBX is now operated as a sub-PBX behind your router. Various festure which are controlled by the network provider and operated by the PBX (such as call-forwarding via provider) can no longer be used. Since this is also dependent on the router we can't provide a listing of what exact features these are.
PBXs with external VoIP connection
If your network provider also provides you the necessary data (e.g. username, password) and allows operating alternate hardware, the VoIP-accounts can be configured directly in your PBX. A converter/gateway (e.g. VoIP-to-ISDN gateways) is not necessary. For this the PBX just has to be integrated in your network, so it can access the internet.
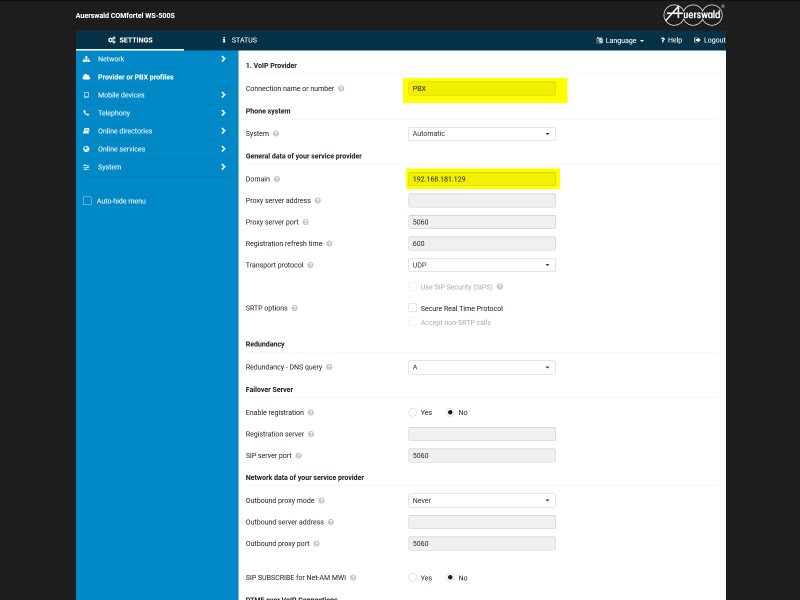
Note: These settings apply to all Auerswald PBXs that provide external internet telephony (VoIP).
COMpact 3000:
In "configuration -> Voice over IP (VoIP) -> VoIP provider" enter a name for the new account, select the according VoIP provider as well as the connection type and click on the green plus-symbol to generate the account.
COMpact 5010/5020, COMmander Basic2/Business:
In "COMset -> external numbers -> Voice over IP (VoIP) -> Provider" click on "online configurations" to download the appropriate provider template (if available).
Afterwards switch action to "import", select the downloaded template und import it.
In "configuration -> Voice over IP (VoIP) -> Accounts" enter a name for the new account, select the appropriate provider as well as the connection type and click on "execute" to generate the account.
COMpact 4000, COMpact 5000, COMmander 6000:
In "Public switched tel. networks -> Voice over IP (VoIP) -> Provider" click on "online configurations", select the according provider template (if available) and "load configuration".
In "Public switched tel. networks -> Voice over IP (VoIP) -> Accounts" click on "New", enter a name for the new account, select the appropriate provider as well as the connection type and click on "save" to generate the account.
Which IP cameras have been successfully tested by us?
Overview IP cameras
Successfully tested IP door terminals/IP cameras:
| Manufacturer | Tested camera | Link for downloading the picture | Default-IP | Default access data | Tested firmware version |
| 2N | - EntryCOM IP Vario | http://IP address of the camera/enu/camera640x480.jpg | DHCP | user: admin password: 2n | |
|
Comment | |||||
| - EntryCom IP Verso | http://IP address of the camera/api/camera/snapshot?width=640&height=480&source=internal | DHCP | user: admin password: 2n | ||
|
Comment | |||||
| ALLNET | - ALL2285 - ALL2288V2 - ALL2295V2 - ALL2296V2 - ALL2298 - ALL2299 | http://IP address of the camera/cgi-bin/jpg/image.cgi? | DHCP | user: admin password: admin | an20130523NSA |
|
Comment | |||||
| - ALL-CAM23xx - Serie | http://IP address of the camera/Streaming/channels/1/picture | DHCP | user: admin password: admin | from version 5.2.0 | |
|
Comment | |||||
| Alphatech | - IP Bell 01C | http://IP address of the camera/video.jpg | 192.168.1.250 | user: admin password: 1234 | VoIP version: 2.13 UDV version: 8.0 |
| Axis | - A8004-VE - M1034-W - M1054 - M3113 - M3204 - M30-Serie - P13-Serie - P33-Serie - Q16-Serie - Q19-Serie | http://IP address of the camera/jpg/image.jpg | DHCP | user: root password: pass | 5.40.9.2 |
|
Comment | |||||
| - P55-Serie - Q60-Serie | http://IP address of the camera/jpg/image.jpg | DHCP | user: root password: pass | 5.40.9.2 | |
|
Comment | |||||
| D-Link | - DCS-932L - DCS-942L | http://IP address of the camera/image/jpeg.cgi | user: admin password: keines vergeben | ||
|
Comment In order for the live background to display the camera image, a user must be created in the camera and the camera app must be set up with its username and password. | |||||
| ELCOM | - BVS 200 - CBM 300 | http://IP address of the camera/mjpg/video.mjpg | |||
| HIKVISION | - DS-2CD2032-I - DS-2CD2xxx-Serie - DS-2CD4xxx-Serie | http://IP address of the camera/Streaming/channels/1/picture | DHCP | user: admin password: 12345 | |
|
Comment | |||||
| - DS-2CD6412FWD-10 | http://IP Adreses der Kamera/Streaming/channels/1/picture | DHCP | user: admin password: 12345 | ||
|
Comment | |||||
| INSTAR | - IN-2905v1 | http://IP address of the camera/snapshot.cgi | DHCP | user: admin password: keines vergeben | |
|
Comment | |||||
| Level-One | - FCS-1060 | http://IP address of the camera/cgi-bin/video.jpg | DHCP | keine | |
|
Comment | |||||
| - FCS-1031 | http://IP address of the camera/cgi-bin/jpg/image.cgi? | DHCP | user: root password: | L20100820NS | |
|
Comment | |||||
| - FCS-0071 | http://IP address of the camera/cgi-bin/admin/snapshot.cgi | DHCP | user: root password: | V2.3_0104 | |
|
Comment | |||||
| - FCS-0030 | http://IP address of the camera/getSnapshot.jpg | DHCP | user: admin password: admin | V1.0.0.42 | |
|
Comment | |||||
| - FCS-0010 | http://IP address of the camera/img/snapshot.cgi?size=N | DHCP | user: administrator password: | V1.0.12 | |
|
Comment | |||||
| LogiLink (Edimax) | - WC0001B - WC0002B | http://IP address of the camera/jpg/image.jpg | 192.168.2.3 | user: admin password: 1234 | |
|
Comment | |||||
| MOBOTIX | - i25 - c25 - p25 - T25 - M25 - D25 - Q25 - S15 - M15 - D15 - V15 | http://IP address of the camera/record/current.jpg (with this link only the image can be retrieved) Earlier MX camera models (i. e. T24, M24, etc.) normally uses the same parameters for pictures. | 10.xx.xx.xx | user: admin password: meinsm | MX-V4.3.4.66 |
|
Comment | |||||
| - i25 - c25 - p25 - T25 - M25 - D25 - Q25 - S15 - M15 - D15 - V15 | http://IP address of the camera/cgi-bin/image.jpg (via this link control information is possible add. to the image) Earlier MX camera models (i. e. T24, M24, etc.) normally uses the same parameters for pictures. | 10.xx.xx.xx | user: admin password: meinsm | MX-V4.3.4.66 | |
|
Comment | |||||
| Roline | - RBOF1-1 - RBOF3-1 - RBOV2-1 - RBOF3-1 - RCIF3-1W - RBOF2-1W - RDOF2-1W - RBOF4-1 - RDOF4-1 | http://IP address of the camera/Streaming/channels/1/picture | 192.0.0.64 | user: admin password: 12345 | |
| StentofonBaudisch | - CP-CAM-Steel | http://IP address of the camera/jpg/image.jpg | 192.168.1.180 | user: admin password: 1234 | |
| TCS | - AVU14010-0010 - AVU940x0 | http://IP address of the camera/video.jpg | 192.168.1.250 | user: admin password: 1234 | |
|
Comment | |||||
| - Carus Argos | http://IP address of the camera/video.jpg | DHCP | Benutzer: admin Passwort: 1234 | ||
| TP-Link | - TL-SC3430 | http://IP address of the camera/jpg/image.jpg?size=3 | DHCP | ||
|
Comment | |||||
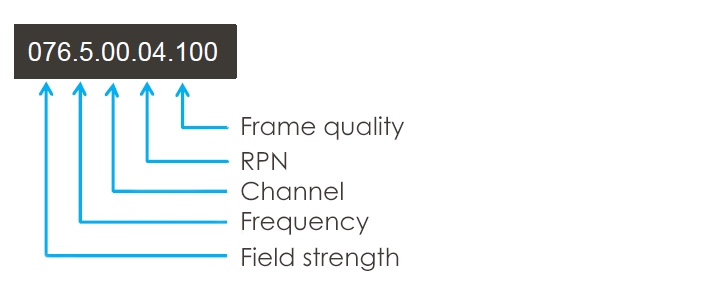
Lower the listening volume dial and speaking volume dial on the base. For most telephones, the correct setting is position 3.
If the audio level is too low in this position, adjust the headset volume control to increase the headset speaker volume.
If your speaking volume is too low for your listener in this position, adjust the position of the headset to make sure the microphone is as close as possible to your mouth.
Adjust the configuration switch. The most commonly used position is "A", which is the default position.
Lower the speaking volume dial or listening volume dial on the base. For most telephones the correct setting is position 3.
If your desk phone has a volume control, lower until the distortion disappears.
If the distortion is still present, adjust the headset volume control to lower the headset speaker volume. If the distortion persists, lower the listening volume dial on the base.
Make sure there is at least 12 inches between your base and your computer, and 6 inches between your base and your telephone.
Make sure your headset is charged.
Make sure your headset is subscribed to base. See manual, Subscribe Your Headset.
Press the call button on your headset.
Adjust the configuration switch on the base until a dial tone is heard.
Fine tune the listening volume on the headset.
If the volume is still too low, adjust the listening volume dial on the base
As an example, the assignment of a key with the "Speed dialling" function:
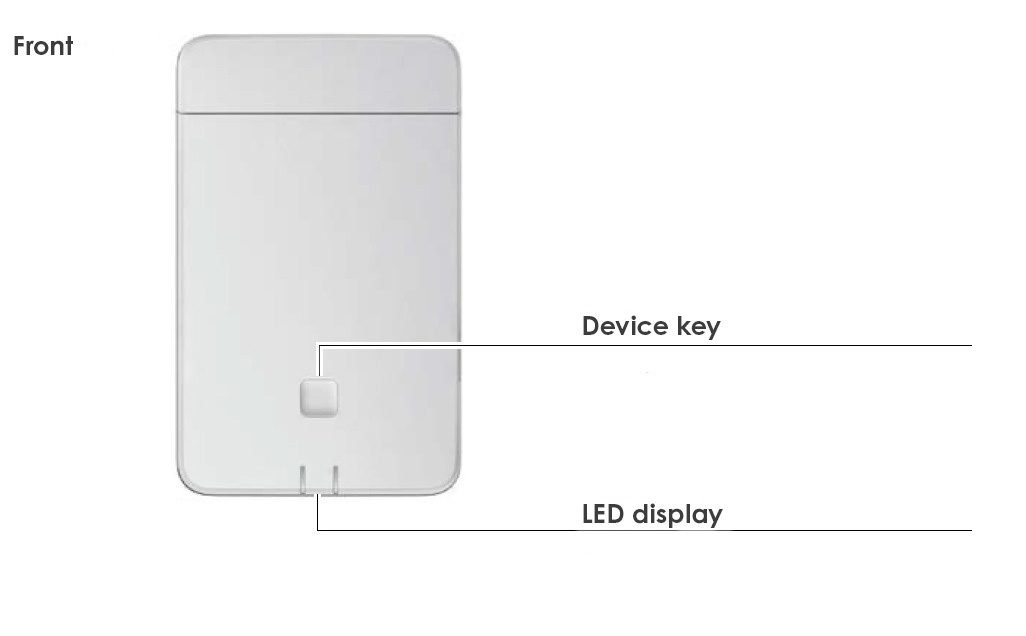
This is located on the packaging and back of the phone.
General
Files that you send us may be subject to data protection. Please make sure that the legal requirements are met.
A lot of information, which data might be included in the logs, you can get directly in the Auerswald-System (current products).
I have my own data server, through which I would like to make the files available
I do not have my own data server, where I can make the files available
Information
Your data, which we receive from you for processing the ticket, is stored in our ticket system on our own servers in our company.
No, all messages are stored on the storage medium (USB stick or SD card) unencrypted. The storage media of COMpact 4000/5000/5200/5500 and COMmander 6000 have the ext4 format and are therefore usually not readable on a Windows PC without additional software.
The storage media of the system telephones are in FAT/FAT32 format and can be read out on a Windows PC without additional software.
Until the maximum number of call data records is exceeded or the entries are manually deleted from the call data list.
If the maximum number of call data records is exceeded, the oldest entries are overwritten.
It is not possible to define a time period after which the call data is automatically deleted.
Only for external VoIP accounts or on an analogue terminal. On external ISDN connections, to ISDN or VoIP extensions, caller identification cannot be prevented.
In the configuration of the VoIP provider used, a user-defined evaluation can be defined under Evaluation of incoming SIP messages, in which all selections for search prioritization are set to None.
For analog terminals, the CLIP info can be deactivated under Subscriber / Function overview / Analogue settings.
Hearing aid support
All current handsets are hearing aid compatible (HAC). To enable this function, a service code must be entered in the handset
For this, dial *99964* during idle state and press the call key. HAC: Disabled appears on the display (in factory settings). With the ‚Select‘ softkey you can switch between Enabled and Disabled.
Many Siedle call stations can be rewired internally so that the loudspeaker is led out at terminals 12 and 13 (without the built-in transistor amplifier). Connect terminal 12 of the Siedle module to one of the door intercom contacts (make contacts 1/2 on the TSA-a/b), connect the other door intercom contact to terminal LSP of the TSA-a/b. Connect terminal 13 of the Siedle module to the 0V contact on the TSA-a/b. This results in a greater maximum volume.
There is a humming in the door intercom, which is connected to the TSA-a/b. What could be the cause?
If the door intercom should work after installation, but still have an unpleasant humming noise, the following points can be considered:
Power supply requirements for COMfortel phones
| COMfortel | Basic unit | with 1 Xtension | with 2 Xtensions | with 3 Xtensions |
| 600 (analogue) | Analogue port of the system | |||
| 1200 (ISDN) | S0/UP0 port of the system* | |||
| 1400 (ISDN) | S0/UP0 port of the system* | |||
| 1600 (ISDN) | S0/UP0 port of the system* | |||
| 2600 (ISDN) | S0/UP0 port of the system* | additional power supply unit (COMfortel XT-PS) | ||
| 1200 IP | PoE (IEEE 802.3af, Class 0) | |||
| 1400 IP | PoE (IEEE 802.3af, Class 0) | |||
| 2600 IP | PoE (IEEE 802.3af, Class 0) | |||
| 3200 | PoE (IEEE 802.3af, Class 0) | additional power supply unit (COMfortel XT-PS) | ||
| additional power supply unit (COMfortel XT-PS) | ||||
| 3500 | PoE (IEEE 802.3af, Class 0) | additional power supply unit(COMfortel XT-PS) | ||
| additional power supply unit (COMfortel XT-PS) | ||||
| 3600 IP | PoE (IEEE 802.3af, Class 0) | additional power supply unit (COMfortel XT-PS) | ||
| additional power supply unit (COMfortel XT-PS) | additional power supply unit (COMfortel XT-PS) | |||
*per port max. 2 telephones, for COMpact 3000 max. 1 telephone
The following Bluetooth headsets have been successfully tested with the COMfortel M-200 handset:
| Producer | Jabra | Plantronics | |||
| Type | PRO 9470 | Discovery 975 | Voyager PRO HD | Savi Go WG100/B | Voyager Legend |
| Bluetooth connectivity | x | x | x | x | x |
| Transmission of the headset ringtone | x | x | x | x | x |
| Call answering via headset | x | x | x | x | x |
| Ending a call via headset | x | x | x | x | x |
| Audio switching between headset and handset1 | x | x | x | x | x |
| Redial via headset | x | x | x | x | |
| Volume adjustment per headset | x | x | x | x | x |
1 Press the right navigation key on the handset and the left softkey to switch between headset and handset
The following SD cards were tested and released for the COMmander VMF module:
| Producer | Capacity | Type description |
| High-quality SD cards in the consumer class | ||
| SanDisk | 4 GB | Ultra 4.0 GB 15 R MB/s, 7W MB/s Class 6 Typ: SDSDAB-004G |
| Transcend | 4 GB | Premium 4GB 133X SDHC Class 10 Typ: TS4GSDHC10 |
| SD cards of the industry class | ||
| ATP Electronic, Inc. | 4 GB | Industrial Grade SD/SDHC Typ: AF4GSDI |
| CACTUS Technologies | 4 GB | Industrial Grade SD Card Typ: KS4GRT-806 |
| CACTUS Technologies | 8 GB | Industrial Grade SD Card Typ: KS8GRT-806 |
| Swissbit | 4 GB | S-210 Series SDHC Memory Card - Class 6 Typ: SFSD4096LvBN2SA-t-dd-111-STD |
Note: The settings apply to all Auerswald PBXs that offer internal IP telephony.
Note: The settings provided by us are non-binding information.
Requirements:
Further steps:
The USB driver is already implemented in openSUSE 10.2. In the default installation only the root user has access to the device /dev/usb/auer0. To use the driver, please add the following access rule to the file "/etc/udev/rules.d/50-udev-default.rules":
KERNEL=="auer[0-9]*" NAME="usb/%k", MODE="0666"
ISDN-systemphones receive the time/date from the PBX.
If the PBX operates using an external ISDN line, time and date is automatically set after each ISDN call. However, if the PBX operates using only an external VoIP- or analog connection, time and date must either be configured manually or automatically set via NTP-server (internet access or a local NTP-server required).
The number of system telephones depends on the power consumption of the existing devices. The maximum power consumption at the internal S0 must not be exceeded.
Available power: max. 4 W per internal S0 bus (all telephone systems with internal S0 bus except COMpact 2204 USB and COMpact 3000)
Required power of the system phones:
Available power at the internal S0 bus of a COMpact 2204 USB: max. 2 W.
Power available on the internal S0 bus of a COMpact 3000 ISDN/analogue/VoIP: max. 2.5 W.
Depending on the constellation, various telephone combinations are possible on the COMpact 2204 USB or COMpact 3000 ISDN/analog/VoIP, e.g. (max. 2 system telephones):
COMfortel 2500 with key extension COMfortel Xtension30 or COMfortel 2600 with key extension COMfortel Xtension300 can only be operated with the power supply unit COMfortel XT-PS.
The headset needs to conform to the "DHSG"-standard in order to operate it directly at the COMfortel 2500's headset jack. The following settings are required for operation:
Recommended parameter settings for Auerswald door intercom systems
| TFS-Universal plus / a/b TFS-Dialog 300 / 400 | TFS-Dialog 200 | |||
| Sensitivity | Volume | Sensitivity | Volume | |
| Parameters | 50 | 57 | 50 | 57 |
| Default value | 3 | 2 | 3 | 2 |
| Auerswald | ||||
| COMander Basic.2 COMmander Business | 3 | 2 | 3 | 3 |
| COMpact 2206 USB COMpact 4410 USB COMpact 4406 DSL | 3 | 0 | 3 | 0 |
| COMpact 2104.2 USB COMpact 2204 USB | 3 | 1 | 3 | 1 |
| ETS-1006 FAX | 1 | 2 | 1 | 2 |
| ETS-2106 I Rev.2 ETS-2204 I ETS-4308 I | 5 | 1 | 5 | 1 |
| Agfeo | ||||
| Agfeo AS 40 | 5 | 3 | 5 | 3 |
| AVM | ||||
| Fritz Box | 3 | 2 | 9 | 1 |
| Fritz Box Fon WLAN 7050 | 3 | 2 | 6 | 6 |
| FEC/Elmeg | ||||
| Elmeg ICT 46 | 5 | 3 | 5 | 3 |
| Panasonic | ||||
| Panasonic KX-TDA15 | 1 | 0 | 3 | 1 |
Note: The installation location, the internal room acoustics and the number of connected a/b switching modules may influence the specified values. The parameter values may deviate from the recommended values.
Preparing the PBX for Remote Access
Registering the PBX in ARA
Method 1: Activation by any internal phone
Method 2: Activation by the dealer from a distance
Auerswald takes the protection of personal data very seriously. Please read the internet privacy statement and the general terms and conditions.
One of the system's internal telephone numbers (subscriber numbers) must be entered in the telephone so that the system recognises the telephone as an internal subscriber. This number must be the one that the telephone is to transmit to the system. This is usually the first MSN entered in the telephone. The same applies to ISDN cards. The internal station number entered in the telephone must of course also be configured in the system as the internal station number of the corresponding internal S0 bus.
If an internal number is entered in the telephone, and this number is also configured in the system, but telephoning is still not possible, then it is very likely that the telephone is not connected to the correct S0 bus. In the system, the internal call numbers are assigned to the individual ports of the system. Therefore the telephone must be connected to the corresponding S0 bus.
The forced assignment of the internal telephone number of the system to an internal S0 port can be switched off by activating the move function.
Special features when using "Sync over Ethernet" (IEEE 1588)
The information given here does not constitute a guarantee of product characteristics.
The main-PBX must have at least 1 internal VoIP-channel assigned.
The sub-PBX must have at least 1 internal VoIP-channel assigned.
Transfer of a caller on the main-PBX to another subscriber on the main-PBX via the sub-PBX:
A static IP address of http://192.168.1.111 is preset in the delivery state. The access data:
User name: admin
Password: admin
The current IP address can be queried on an ISDN telephone using the code ##8*941#.
The IP address is only displayed on the directly connected ISDN telephone, not on the internal S0 bus of our telephone systems.
Info: Display messages are used
COMmander Business and COMmander Basic.2 only: A replacement option is the automatic callback from the VoIP/ISDN gateway. With this callback, the IP address is then transmitted as the phone number.
Translated with www.DeepL.com/Translator (free version)
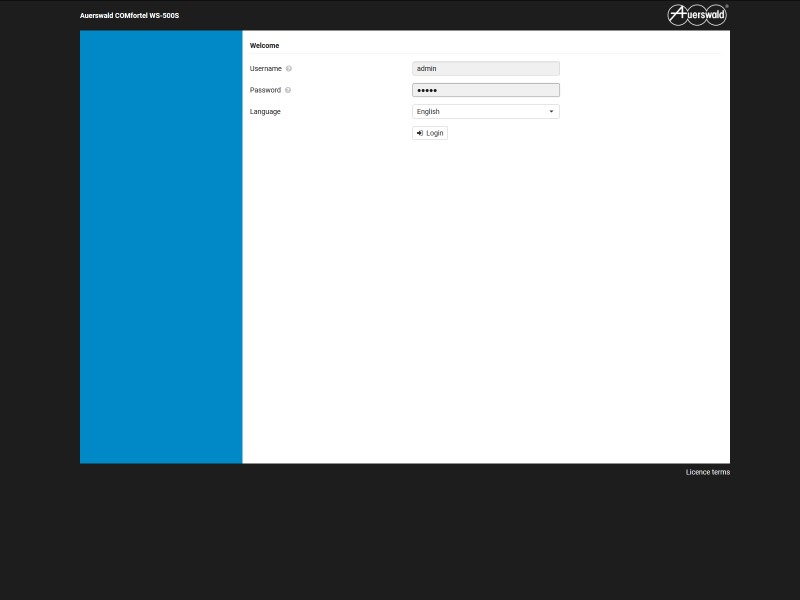
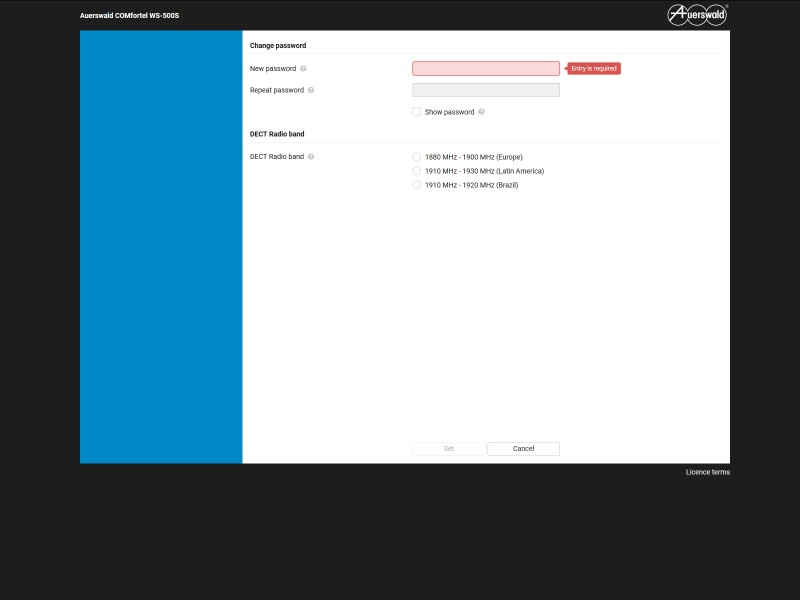
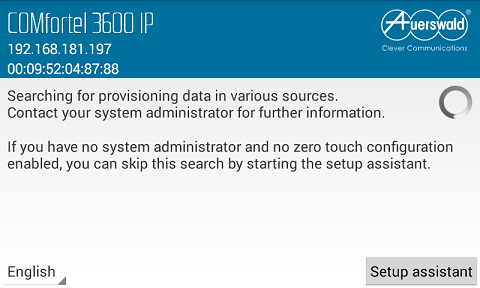
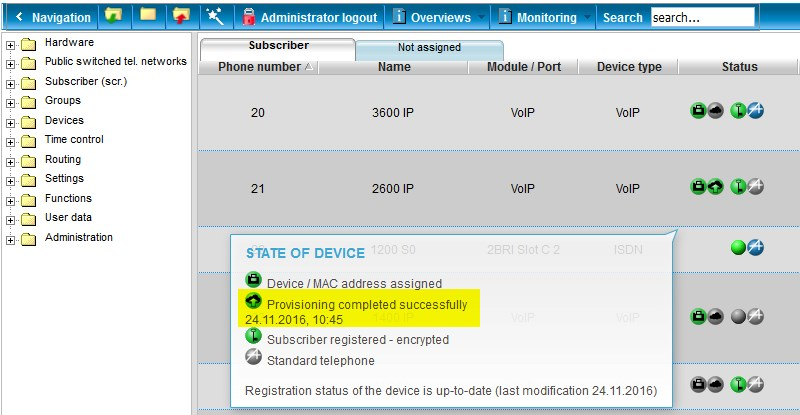
This FAQ describes the simple first setup of Auerswald VoIP systemphones by using zero-touch configuration thus setting the phone's provider and account configuration by the PBX (basic provisioning).
Supported by the following PBXs (from version 6.6D):
Supported by the following IP systemphones (from version 2.6B):
Technical requirements:
Screenshot of the phone's Zero-Touch-configuration (only displayed in factory default):
Procedure:
Note:
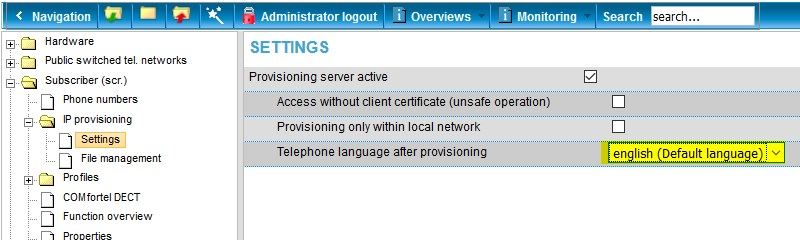
The Phone language can be set in the pbx:
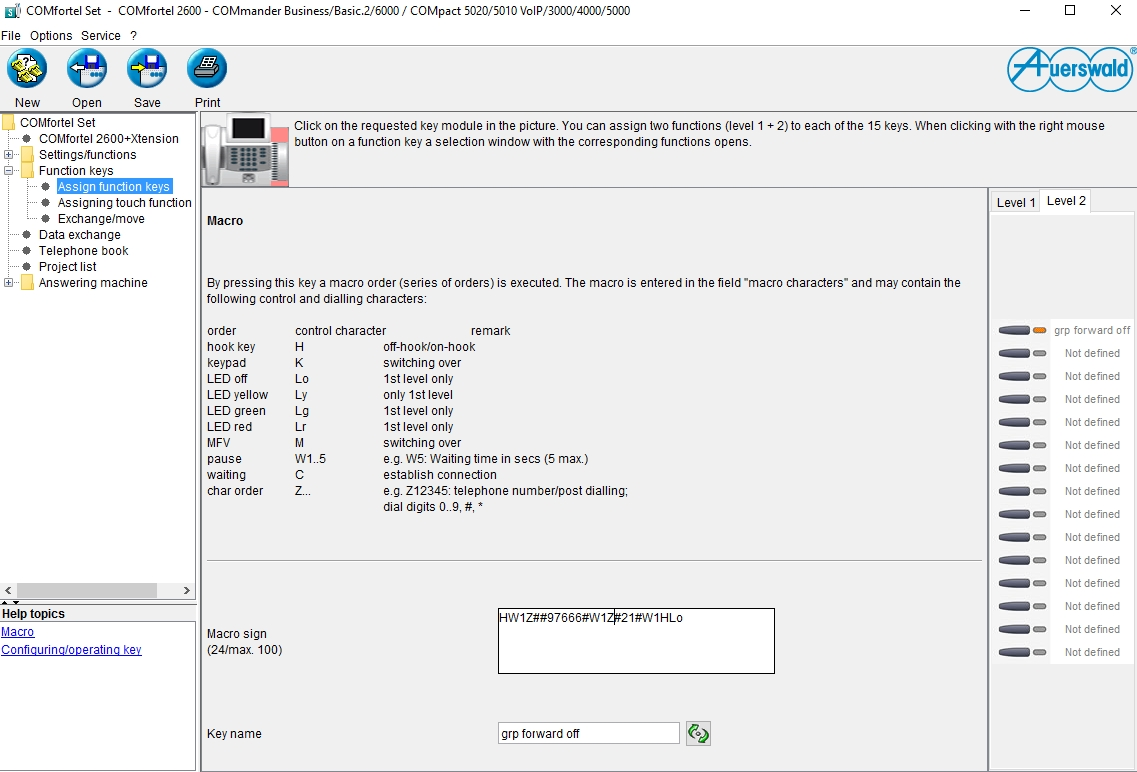
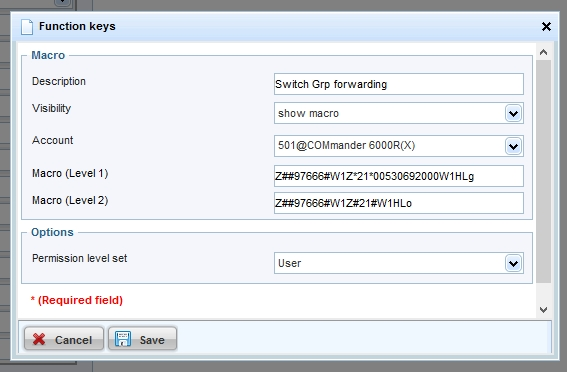
Since it is not possible to switch group call forwardings via the systemphone's menu or by setting up a system-key, the PBX's programming sequence must be used.
Sequence for enabling unconditional group call forwarding:
##97 [grp.-number] # *21* [target number] #
Sequence for disabling unconditional group call forwarding:
##97 [grp.-number] # #21#
According to the setting "direct exchange line" the group and target number (external/internal) must be entered with the preceding exchange line access number "0" or rather **.
If using the function "system-wide automatic exchange line request" (from firmware 6.6B), only the internal number is entered.
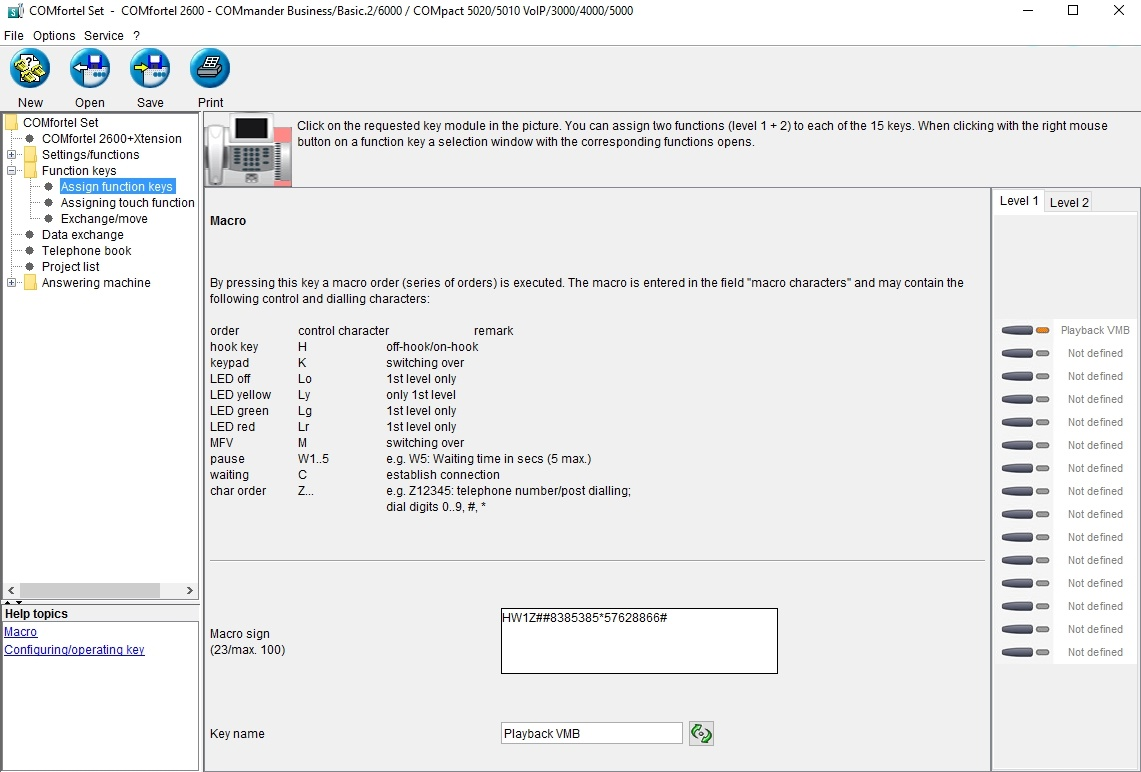
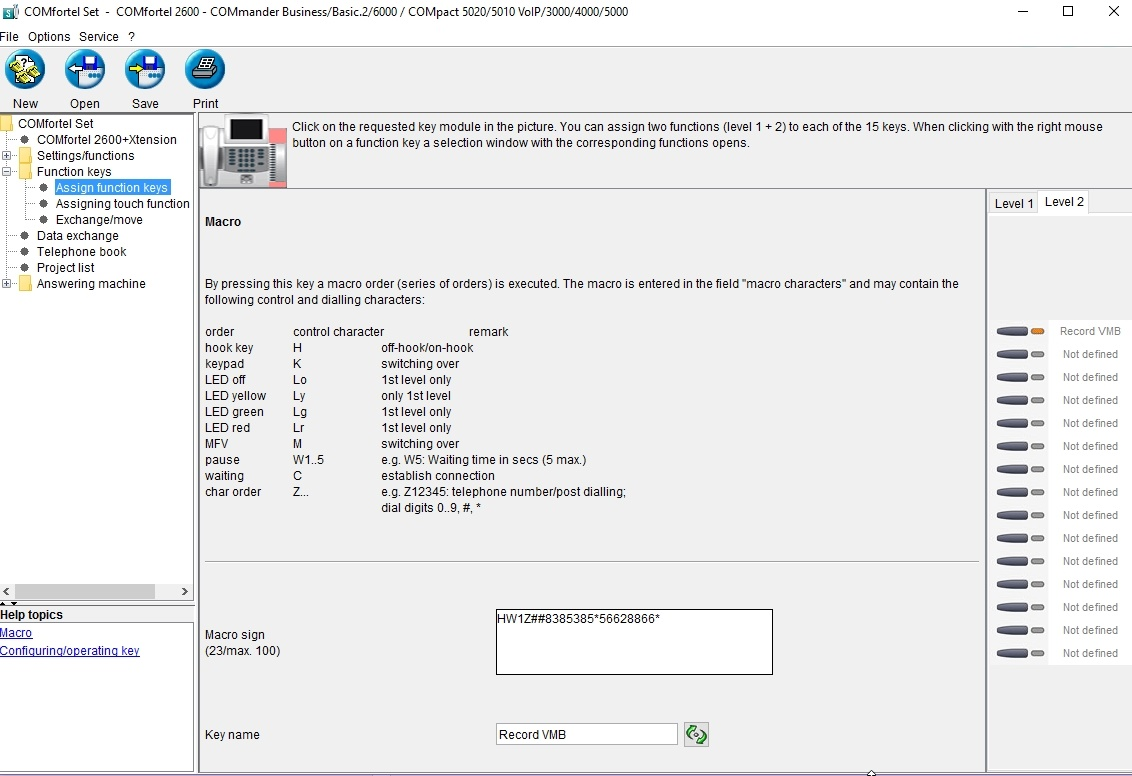
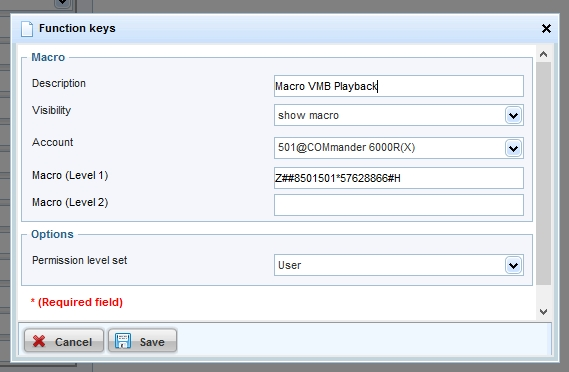
The function keys on systemphones can be set up with a macro-function, to let the phone dial the programming sequence on its own.
A macro key can e.g. be set up as follows:
Enable unconditional group forwarding:
Level 1 of the key
HW1Z ##97 [grp.-number] # W1Z *21* [target number] # W1H Lr
Disable unconditional group forwarding:
Level 2 of the key
HW1Z ##97 [grp.-number] # W1Z #21# W1H Lo
On IP-systemphone the preceding "HW1" is left out (Z##97...) and the system account must be selected for the key.
Example COMfortel 2600 ISDN:

Required settings in COMfortel Set to operate a simple answering machine
The software COMfortel Set can be found on the Auerswald Mega Disk or in the download area on the Auerswald website.
To use the simple answering machine function of COMfortel Voicemail in the telephones COMfortel 2500 or COMfortel 2500 AB, no time control is activated. The answering machine is only switched on or off via the softkey at the bottom right of the display.
In the menu Automatic you select a call acceptance type under External Calls in the first line of the table (in the example: announcement and recording). The selection is displayed when you double-click in the field. After the greetings have been synchronized with the SD card, you can enter your desired greeting in the Greetings column. After double-clicking in the field you can select the corresponding greeting from a list (here: HOUSE.WAV).
Add a new user for the phone's VPN connection in the FritzBox under System / Fritz!Box User, e.g. D400Home and set a secure password; you do not need to enter an e-mail address.
Give this user the VPN authorisation, all other authorisations are not required for the VPN connection; the option Access also allowed from the Internet does not need to be active either.
Accept the settings and then display the VPN settings.
Make a note of the user name, the password you have assigned, the server address (fixed external IP or Dyn address) and the IPSec key.
In the web interface of the device, the connection must be activated via the VPN switch on the VPN tab and IPsec Xauth PSK must be set as the VPN type.
Now enter the following data:
When you save the settings, the VPN connection is established. Successful connection establishment is signalled with a key symbol in the top line of the D-400 display.
A key can be assigned to the VPN function to conveniently switch the VPN connection on or off as required; the connection can also be controlled via the phone menu under Settings / Network / VPN.
Starting with Telephone Firmware 1.4A and System Firmware 7.6B, it is possible to initiate dialling on D-Series telephones using action URLs.
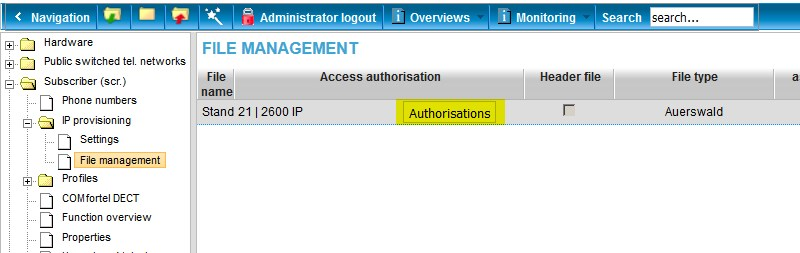
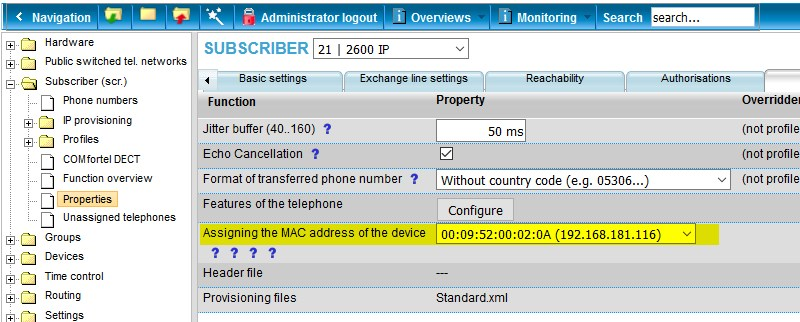
If the telephone is not provisioned via the PBX, the following has to be regarded for manual setup:
Due to the increased volume of telephone traffic, the transfer points of VoIP providers may reach their capacity limits. A solution is sought by the providers through load balancing. The load distribution is done with a DNS SRV query. The DNS SRV is used to enable the provider to notify the registrars prioritised by him. The DNS resolution must be carried out by the provider. For this purpose, the router must use the DNS servers of the provider.
Current ICT systems:
Note the following points in the configuration:
Early generations of hybrid telephone systems:
These systems do not support the dynamic procedure and can therefore no longer be operated on the respective VoIP account after platform changeover. In these cases, the ICT system must be replaced by a compatible system.
Prerequisites:
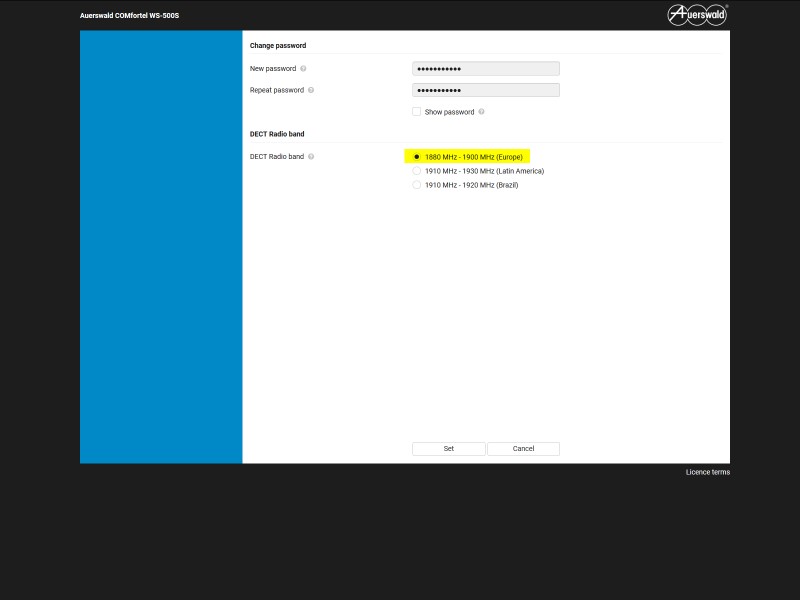
You need a firmware version 7.8A or newer AND a DECT base firmware 2.26.0 or higher to uses this
feature!
In Firmware versions prior to 7.8A the priovisioning file do not contain the necessary information to
enable distincgge ringing.
Starting with version 7.8A-000 the file contains information, but the information is disabled by default to
avoid errors and warnings while provisioning a WS500x base with a firmware version older than V2.26.0.
To enable this feature you have to:
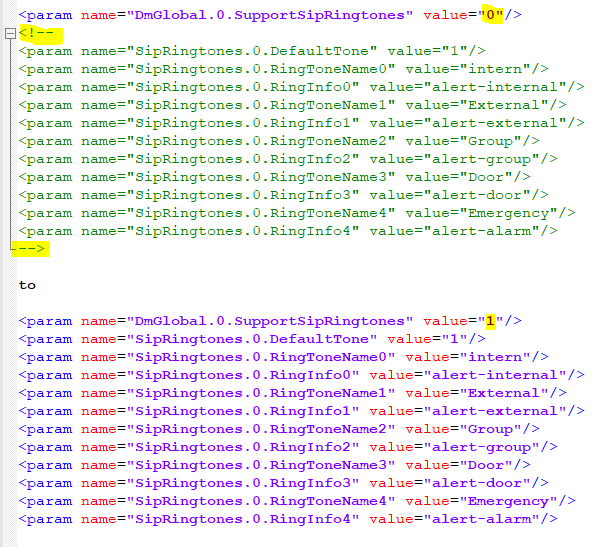
You can now store your new configuration file. This will automatically trigger the provisioning
process.
After successfull provisioning, you have to re-register all of your handsets . Only now the new
ringtone settings are shown in the menu of the handset. You can have to manually choose your
favorite ringtone for each calltype on every device.
You can now make incoming and outgoing calls with the phone using the identity you have set up.
Important: The COMfortel SoftPhone is available licence-free for a limited period of time. The COMfortel SoftPhone can also be used in the tryout mode in the COMtrexx. For permanent use, please contact your dealer or system partner.
Configuring the use of the COMfortel SoftPhone in the COMtrexx
Requirement: Firmware from 1.6
Note: Softphones are very often not tied to a location and are therefore created by default without a location. The correctly assigned location is necessary, among other things, so that the PBX can properly initiate an emergency call.
Install Softphone in the device
The installation file for the COMfortel SoftPhone can be found here: COMfortel® SoftPhone
COMfortel SoftPhone Mobile: The clients are installed via the Google Play Store or Mac App Store.
Enter user name and password in the softphone
Note: The registration information for the COMfortel SoftPhone is emailed to the user when the phone is set up. Sending can be restarted later (e.g. after changing the user):
Note: The registration information can be copied here:
Note: If logs of a COMtrexx are required for diagnostic purposes by the support, you will receive a cfc file that enables the recording of certain system processes.
Setting up Wireshark logging in the COMtrexx
Performing Wireshark logging
wireshark.exe -i TCP@IP_PBX:42231wireshark.exe -i TCP@192.168.0.240:42231.Wireshark starts with a new user interface
Note: To limit the file size for a longer recording, the maximum size of the files can be set in the recording options.
Numbering and date/time are then appended to the file names: COMtrexx-Log_00001_20220404103804, COMtrexx-Log_00002_20220404104014
In the spirit of best serving our customers’ safety and security, we have decided to remove support for Microsoft’s ActiveSync protocol; this was available as an optional feature for some COMfortel devices.
Microsoft has begun phasing out external support of said protocol, and more importantly has publicly announced several security concerns regarding ActiveSync itself.
While Auerswald cannot promise extending support to replacement protocols—primarily because Microsoft has not yet fully implemented support for newer sync services such as Microsoft 365—we are always following the needs of our customers and will continue to explore future sync service options.
We highly recommend continuing to deploy updates to your Auerswald/FONtevo devices, as withholding security updates can cause fundamental service outages and liabilities.
Requirements:
PBX firmware 8.2 or newer
COMfortel WS-500x firmware 2.48 or newer
To use the alarm-messaging or alarm-messaging-location features, the provisioning file for the COMfortel IP DECT system must be supplemented in the telephone system.
Switching on the function:
<!-Switch on alarm messaging and location for all handsets--->.
  <oper name="set_hs_aml" value="@">

   <param name="LocationAML" value="1"/>

   <param name="MessagingAML" value="1"/>

  </oper>
OR
<!-- for individual handsets -->
  <oper name="set_hs_aml" value="IPUI des Handsets">

   <param name="LocationAML" value="1"/>

   <param name="MessagingAML" value="1"/>

  </oper>
Activate alarm server certificate:
  <oper name="set_uci">

   <param name="mosquitto.listener.enabled" value="1" />

  </oper>
Release of the ring tones in the COMfortel DECT handset:
  <settings version="1.0" productID="e2">

   <param name="AmlGlobal.0.HottestAlertNameHigh" value="High prio"/>

   <param name="AmlGlobal.0.HottestAlertNameMid" value="Medium prio"/>

   <param name="AmlGlobal.0.HottestAlertNameLow" value="Low prio "/>

  </settings>
If SIP text messages are to be displayed (e.g. with the call systems GIRA 834 Plus and Hospicall P3 or P7), the following must be added:
<!-- Set display name, priority, display duration, message memory duration and ringtone. -->
   <param name="SipProvider.0.AML_TitleText" value="GIRA Rufsystem"/>

   <param name="SipProvider.0.AML_Prio" value="3"/>

   <param name="SipProvider.0.AML_PresentationTimer" value="10"/>

   <param name="SipProvider.0.AML_TTL" value="3600"/>

   <param name="SipProvider.0.AML_AlertInfo" value="msg_melody_mid"/>
Assigning the AM and AML licenses
Download PDF (German) for setting up the messaging interfaces for the COMfortel® IP-DECT system and the COMfortel® D series via COMtrexx® autoprovisioning
The COMfortel D-Series is able to display information and also dialogues with the user via the mini-XML browser.
In order to achieve a specific browser call, e.g. via http request, the Lua script "minibrowserAutoStarter.lua" must be uploaded to the telephone via backup.
. Alternatively, the script can be inserted into the provisioning file.
In addition, a token for authentication must be provisioned:
Insert between "authTokens".
<authToken>

<token>here is the secret token inside</token>

</authToken>
There are some scripts available in the appendix for use.
Test call e.g. browser:
https://IP-Adresse of the phone/api/v1/exec/listenForMinibrowserTrigger?AuthToken=here is the token in it&url=http://Adresse where the XML is/to be retrieved XML
Example
https://192.168.1.60/api/v1/exec/listenForMinibrowserTrigger?AuthToken= mysteriousToken &url=http://192.168.1.159/mb_dialog.xml
Appendix:
Scripts
Error messages on the SoftPhone
With the update to OpenVPN 2.6, the obsolete `cipher` option has been removed.
If your OpenVPN client configuration no longer works, try replacing the `cipher` parameter with `data-ciphers` in your file.
Try the following change in the configuration file:
Replace the line:
cipher AES-256-CBC
with the following three lines:
#cipher AES-256-CBC
data-ciphers AES-256-CBC:AES-256-GCM:AES-128-GCM:CHACHA20-POLY1305
data-ciphers-fallback AES-256-CBC
Restart the VPN on the phone.
If the VPN still does not work, further measures may be necessary on the client and/or server side.
In this case, talk to your system administrator.
Translated with DeepL.com (free version)
Due to ever-increasing IT security requirements and new specifications from providers, Auerswald cannot guarantee that all telephones from other manufacturers can be put into operation and used permanently with the full range of functions. Especially with older third-party telephones, which no longer receive firmware updates from the respective manufacturer, functions can only be supported to a limited extent or not at all.
In principle, PBX Call Assist 5 can still be used. However, if the software assurance is not extended, the scope of features will be significantly limited: neither the Microsoft Teams app nor the latest versions of the mobile apps will be useable. In addition, systems without software assurance do not receive bug fixes and security updates, and there is no access to subsequent releases with new functions.
Requirements:
Process:
Activate the function and enter the Microsoft Teams Tenant ID.
After login, grant user and administrator consent:
Please note that in the event of password changes or an expired password of the administrator or user account that was used for admin or user consent, the authorization must be reissued in the UCServer to ensure functionality.
Provision of the APP:
In the PBX Call Assist 5 installation package you will find the PBX Call Assist 5 manifest file “AppManifest.zip” in the “MS Teams” subfolder. This can be uploaded by the administrator in the Microsoft Teams Admin Center and installs the latest Call Assist app for Microsoft Teams
Use in Microsoft Teams:
After the PBX Call Assist app for Microsoft Teams has been released by the administrator in Microsoft Teams Admin Center, the app is available to all employees of the organization in the Microsoft Teams App Store under "Developed for your organization" and can be easily added to the Microsoft Teams client:
The user logs in with his user data (UCServer).
The service URL corresponds to the address of the UCServer in the network. On a local system use http://localhost:7224, on a remote system use http://ip-address:7224
The PBX Call Assist app is then available to the user:
Workaround for the COMfortel IP-DECT system
With firmware 2.53 the number of AM and AML licenses present in the COMfortel IP DECT system is checked. If no licenses or less licenses than handsets are active in the system, in rare cases an error message appears in the handsets after some time. In addition, this instruction saves the manual assignment of AM and AML licenses to the handsets in the DECT Manager.
You can remedy this with this workaround:
Please create a new template for COMfortel WS-500 in the phone system. Then click on Edit.
In the provisioning file, search for „<!—Enable AML for all connected handsets".
Change these parameters:
<param name="LocationAML" value="0"/>

<param name="MessagingAML" value="0"/>
In the PBX, assign the provisioning file to the DECT manager. Perform provisioning. Open the provisioning file again.
Now the tag must be commented out:
Please cut out „-->“ in the first line.
<!-- Enable AML for all connected handsets -->

<oper name="set_hs_aml" value="$(m5x0.ipui)">

   <param name="LocationAML" value="0"/>

   <param name="MessagingAML" value="0"/>

</oper>
And add at the end of the tag
<!-- Enable AML for all connected handsets

<oper name="set_hs_aml" value="$(m5x0.ipui)">

   <param name="LocationAML" value="0"/>

   <param name="MessagingAML" value="0"/>

</oper>

-->
Perform provisioning.
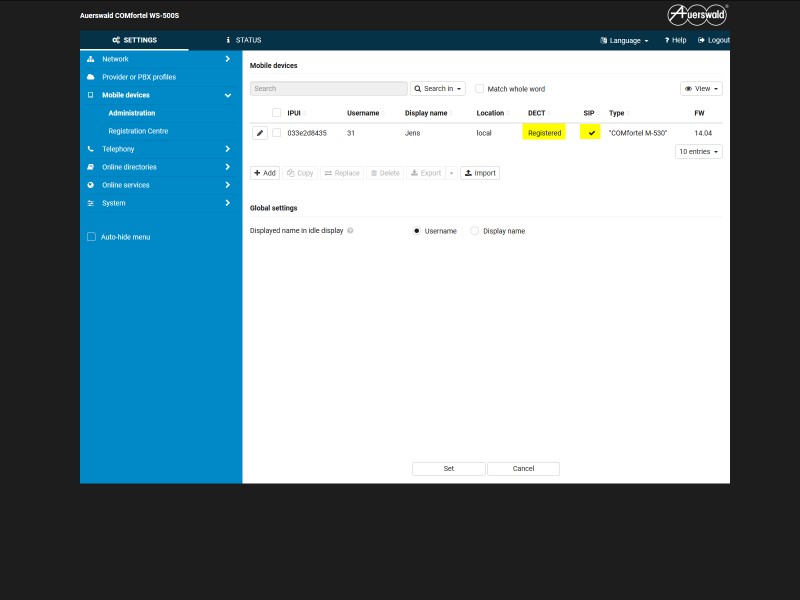
Subsequently, in the DECT Manager under
Settings -> Handsets
Edit the appropriate handsets and enable and save messaging:
Messaging -> Yes
Setting up the alarm-messaging or alarm-messaging-location function via provisioning