COMfortel® D-200

Product status End-of-Support: Jul. 2024
No further software updates or upgrades

Product status End-of-Service: Jul. 2026
No further technical support

Productstatus End-of-Repair: Jul. 2026
No further repair service

Téléchargements

Désignation
Système d'exploitation

Afficher moins Afficher plus

Documentations

LanguesVersion actuelle
Déclaration de conformité D-100 / D-200 / D-Mount V03 10/2022 PDF
Déclaration de protection des données V02 05/2021 PDF
Informations avancées V11 10/2023 Online PDF
V11 10/2023 Online PDF
Notice d’utilisation V03 03/2021 PDF
Guide rapide V02 02/2021 PDF

Déclaration de conformité D-100 / D-200 / D-Mount

Normes :

  • EN55032:2015/A11:2020 remplace EN 55032:2015
  • EN55035:2017/A11:2020 remplace EN 55024:2010+A1 :2015

Informations avancées

General information

Help/instructions for phones of the COMfortel D-Serie from firmware version 2.8


New descriptions

Information on Release 2.8

Contains information on the new firmware version.

boss secretary function

New functions for function keys.

DTMF call

New function.

Google

New function.

Handset sidetone

New settings.

ME Contact

New options/information for setting up.

Multicast

New function.

Cleaning

New function.

Scripts

New setting options.

Service functions

New options. Information summarised and updated.


Changed descriptions

Caller list

New settings.

Date and time

Updated information on NTP.

Display and LED

Information summarised and updated.

Function keys

Setup paths for function keys for various functions added.

Identities

Information summarised and updated.

Contacts

Information summarised and updated.

Network

Information summarised and updated.

Sound

Information summarised and updated.

Update

Update via USB storage medium added.

Various


Several editiorial changes


Notice d’utilisation

Informations importantes

Spécifications techniques > Port USB: COMfortel D-XT20i ajouté

Plusieurs changement rédactionnels


Guide rapide

Titre

COMfortel D-110/210 ajouté

Remarques fondamentales

Faire défiler: Description pour nouvelle fonction ajouté

Aperçu de l’appareil

Touches fonctionnelles à droite et à gauche de l’écran (3x de chaque côté), avec LED: Description pour nouvelle fonction ajouté

Plusieurs changement rédactionnels

Déclaration de protection des données

Pour les produits suivants :

  • COMfortel D-100
  • COMfortel D-110
  • COMfortel D-200
  • COMfortel D-210
  • COMfortel D-400
  • COMfortel D-600

Pour le firmware suivant :

  • 2.8

Langue :

  • Allemand
  • Anglais
  • Français

FAQs

Prerequisites


  •     FRITZ!Box firmware version 06.30 or higher
  •     Telephone firmware version 1.2 or higher
  •     Fixed IP or a DynDns account via which the FritzBox can be reached externally
  •     IPv4 address (IPv6 VPN connections are not supported by the FRITZ!Box)


Installation


Fritz!Box

Add a new user for the phone's VPN connection in the FritzBox under System / Fritz!Box User, e.g. D400Home and set a secure password; you do not need to enter an e-mail address.

Give this user the VPN authorisation, all other authorisations are not required for the VPN connection; the option Access also allowed from the Internet does not need to be active either.

Accept the settings and then display the VPN settings.

Make a note of the user name, the password you have assigned, the server address (fixed external IP or Dyn address) and the IPSec key.


Telephone

In the web interface of the device, the connection must be activated via the VPN switch on the VPN tab and IPsec Xauth PSK must be set as the VPN type.

Now enter the following data:


  • Name: Any name for the VPN connection, e.g. VPN company
  • Server: Server address (fixed external IP or Dyn address) of the Fritz!Box
  • User name: User name for the VPN connection, in our example D400Home
  • Password: Password of the user D400Home from the Fritz!
  • DNS server: remains empty
  • Search domains: remains empty
  • Forwarding routes: IP addresses that can be reached via this VPN connection can be left blank. 192.168.178.0/24, for example, stands for the address range 192.168.178.1 - 192.168.178.255.
  • IPsec ID: User name for the VPN connection, in our example D400Home
  • Pre-installed IPsec key:IPSec key from the Fritz!Box
  • The following certificates, keys or OpenVPN configurations do not need to be used in our example.

When you save the settings, the VPN connection is established. Successful connection establishment is signalled with a key symbol in the top line of the D-400 display.

A key can be assigned to the VPN function to conveniently switch the VPN connection on or off as required; the connection can also be controlled via the phone menu under Settings / Network / VPN.

Setting up the IP telephone in the FRITZ!

  1. Click on "Telephony" in the FRITZ!Box user interface.
  2. In the "Telephony" menu, click on "Telephony devices".
  3. Click on the "Set up new device" button.
  4. Activate the option "Telephone (with and without answering machine)" and click on "Next".
  5. Activate the option "LAN/WLAN (IP telephone)" and click on "Next".
  6. Enter a user name with at least eight characters.
  7. Enter a password with at least eight characters and clearly different from the user name and click on "Next".
  8. Select the phone number for outgoing calls and click on "Next".
  9. Specify which phone numbers the phone should respond to and click on "Next".
  10. Click on "Finish" to save the settings and also confirm the settings on the FRITZ!Box if you are prompted to do so.

Set up identity in the COMfortel D-Series phone

  1. Activate access to the web interface on the phone in the menu >Settings >Access >"Web administration (https)".
  2. Open the COMfortel D-Series web interface.
  3. Access during initial login: User name and password = admin
  4. Click the arrow under Identities to edit.
  5. SIP user name = FRITZ!Box user name
  6. Password = FRITZ!Box password
  7. SIP registrar = FRITZ!Box IP address
  8. Authentication name - not required
  9. Save entries and activate identity.

You can now make incoming and outgoing calls with the phone using the identity you have set up.

With the update to OpenVPN 2.6, the obsolete `cipher` option has been removed.
If your OpenVPN client configuration no longer works, try replacing the `cipher` parameter with `data-ciphers` in your file.

Try the following change in the configuration file:

Replace the line:

cipher AES-256-CBC

with the following three lines:

#cipher AES-256-CBC
data-ciphers AES-256-CBC:AES-256-GCM:AES-128-GCM:CHACHA20-POLY1305
data-ciphers-fallback AES-256-CBC

Restart the VPN on the phone.

If the VPN still does not work, further measures may be necessary on the client and/or server side.
In this case, talk to your system administrator.

Translated with DeepL.com (free version)

Créez un abonné VoIP avec le type d'appareil "Téléphone VoIP standard" dans le gestionnaire de configuration du PBX sous "Abonnés -> Numéros de téléphone" et attribuez l'adresse MAC correspondante ou saisissez l'adresse MAC.

  • Déterminez l'adresse MAC du téléphone.

    L'adresse MAC se trouve sur l'emballage et au dos du téléphone.

  • Créez un fichier de provisionnement pour le type d'appareil "COMfortel D-Series" sur le PBX sous "Abonné -> IP-Provisionnement -> Gestion des fichiers" et accordez à l'abonné une autorisation d'accès.
  • Maintenant, branchez le téléphone. Il est maintenant doté des paramètres correspondants du fichier d'approvisionnement attribué et est alors prêt à être utilisé.

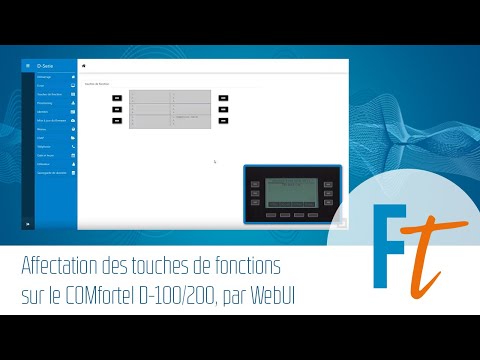
Par exemple, l'attribution d'une touche avec la fonction "numérotation à une touche" :

  • L'affectation des touches est possible sous "Menu -> Paramètres -> Touches de fonction".
  • Sélectionnez un niveau et une clé pour l'affectation.
  • Sélectionnez la fonction souhaitée, en l'occurrence la "numérotation à une touche".
  • Saisissez une étiquette sous "Étiquetage des clés" si nécessaire et confirmez avec la touche "OK".
  • Sous "Numéro d'appel/URI", entrez le numéro d'appel demandé (interne/externe) et confirmez avec la touche "OK".

    Note :
    Par défaut, la saisie de texte est active. Pour entrer des chiffres, soit vous appuyez sur la touche à plusieurs reprises jusqu'à ce que le chiffre soit sélectionné, soit vous maintenez la touche enfoncée pour sélectionner le chiffre immédiatement.
  • Sous "Identité", sélectionnez l'identité pour laquelle la clé doit être utilisée et confirmez avec la touche "OK".
  • Confirmez avec "OK" sur l'écran et sélectionnez une autre touche pour l'affectation ou quittez le menu avec la touche "Retour" ou "Accueil".


Vidéos

Affectation des touches de fonctions sur le COMfortel D-100/200, par PhoneUI

Dans cette vidéo de la série de tutos relatifs à la nouvelle série COMfortel D, nous vous présentons, à l’appui de deux…

Paramétrage de LDAP sur le COMfortel D-100/200

Vous souhaitez en savoir plus sur le paramétrage de LDAP sur le COMfortel D-100/D-200 ? Pas de problème. Cette vidéo de…

Lecture de l’adresse IP sur le COMfortel D-100/200

Vous souhaitez lire votre adresse IP sur le COMfortel D-100/D-200 ? Dans ce court tutoriel vidéo, nous vous présentons…

Mise en attente et transfert sur le COMfortel D-100 / 200

Dans cette vidéo, nous vous présentons, à l’appui de quatre exemples, la façon de mettre un appel en attente, sur un…

Mise en service d’un COMfortel D-100/200 par l’intermédiaire du WebUI, sans approvisionnement

Vous pouvez voir, dans cette vidéo, la mise en service du COMfortel D-100/D-200 par l’intermédiaire du WebUI, sans…

Affectation des touches de fonctions sur le COMfortel D-100/200, par WebUI

Dans cette vidéo de la série de tutos relatifs à la nouvelle série COMfortel D, nous vous présentons, à l’appui de deux…